What inspires you? Do you tend to go towards the poetry side when jotting things down or do you need to put a little more thought into it? I would love to say I had a poet within, but sadly I do not. I tend to be the one that puts a little more thought in it and has that pile of paper crumpled up on side of me. Just kidding, I use a pencil or S Note on my Tablet.
I am a vintage lover and a lover of this quote in particular:
"FAITH MAKES ALL THINGS POSSIBLE,
LOVE MAKES ALL THINGS EASY,
HOPE MAKES ALL THINGS WORK"
- Wall Quotes Canvas Banner
So grab a clay pot, some inspiration and get to creating!
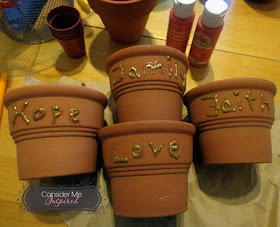
HOPE, FAITH, LOVE and FAMILY was the affirmations we chose to go with. All of those are feel good words and are sure to make anyone smile.
You are just going to love this and I know even if you are not a crafter, this should be a breeze of a project. The longest this project takes is waiting for it to dry.
Here is the how to:
Clay Pots
Some kind of glue to write with
Newspaper for your work surface
Toothpicks to adjust your writing if you squeeze out too much paint
Sponge Brush and Paint Brush
Scrapbooking paper- 8.5 x 11 cut length wise.
The 4 papers- 4 that were placed on the shelf right by each other was my coordination inspiration. :)
*They are were my favorite and all scrapbooking paper is coordinated with matching colors and designs so you can't go wrong by choosing ones closest.
Paint- Craft Smart{Red} and Apple Barrel {Red Apple} blended
Matte Mod Podge
Step 1: Choose and paint out your words; let dry.
Step 2: Blend paint and paint a few coats of paint over your letters. The glitter paint was a bit harder to paint over, because it kept popping through. If you want that sparkle then I wouldn't worry about it too much. I did 3 coats of paint with a sponge brush. {Sponge Brush prevents lines and the sponge design blends with the pot} Let dry.
Step 3: I cut the paper long ways to avoid bubbles in the design. Cut each strip 4 to 5 times depending on the size of your pot. You want to be able to wrap it with no space in between the paper and pot. Once it is measured out apply your Mod Podge on the planter; apply your strips and apply Mod Podge over your paper surface with a paint brush. Let dry for 24 hours.
* I made these to go inside my moms kitchen window for herbs, however I am not sure how long they would hold up outside. I am sure it is very possible they would be fine. You can always apply material rather than paper and the Mod Podge works with material as well. They would be able to be placed outside and rained on without an issue. I am not all to sure on mildewing of the material depending on weather conditions. This was my first time making these, so my experience with how they hold up is very low.
I hope you enjoyed this crafts and I look forward to bringing you many more coming soon.
MEET GINGER!
Her latest post is:
I want silky smooth legs....I am headed to check it out some more and hope you will join me.


