This is everything that came in the package ready to decorate.
Kit Includes:
1 Monster High Centerpiece
1 Monster High Add An Age Banner
1 Monster High Swirl Cutouts
1 Monster High Confetti
10 Black Balloons
10 Hot Pink Balloons
1 Blue Curling Ribbon
Kit Includes:
1 Monster High Centerpiece
1 Monster High Add An Age Banner
1 Monster High Swirl Cutouts
1 Monster High Confetti
10 Black Balloons
10 Hot Pink Balloons
1 Blue Curling Ribbon

This is what I did with the items in the box:
- I did have to separate the banner because it was so large and beautiful. My doorway just called for it to be spaced together more. It worked perfectly and added to a perfect back drop. The centerpiece for the banner comes fully customizable with each age with removable stickies. {st, nd, rd, th included}
- I took the balloons to Party City and had 12 of them blown for the price of $12.99 and had extras left over. The balloons were tied off with the royal blue streamer.
- The swirl streamer hung from the ceiling creating a lovely Monster High themed atmosphere. They dangled at a nice length.
- The cardboard hearts that came in the centerpiece package found themselves attached to the Happy Birthday Banner backdrop.
- The Monster High centerpiece was really lovely and served as a small cupcake stand. I was surprised at how large it was.
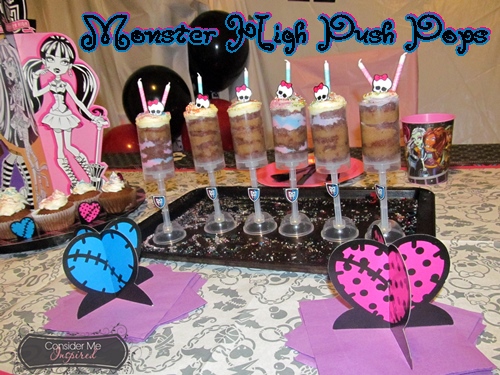
- The confetti was used as the scatter for the push pops, as well as the pop toppers and the pop stands. I just used double sided tape to attach the Monster High icon to the front of the cake pop stand. I positioned the little skull with a bow on the top of the frosting.
Things I had previously picked up:
- Monster High table cloth for $2.75
- Monster High themed tumbler $.87
- Pink table cloth to wrap and tie to the birthday girl chair $1
- White table cloth to use as photo back drop and to attach banner to $1
- Devils food cake mix, pink/purple swirl frosting and coconut pecan frosting $8
- Cake Push Pop stands was on sale for $4 normally $6- no piping bag or tip
- Purple napkins, pink plates and black plastic ware $3
- Pink and teal zebra designed candles $2
Cake Push Pops:
- Bake your cupcakes according to the box and let cool completely.
- Take 1 of your cake pop tubes and push through the center of the cupcake.
- Slice a few layers into your cupcake and place one at the bottom of the tube.
- Pipe your frosting in between each layer of cake.
- Swirl your frosting at the top and let your child take over the sprinkles for the top.
- Insert your Monster High confetti and your candles. All done.
It was a little messy and calls for a larger amount of frosting than I anticipated. Super sweet and enough to make any little girls day. A great excuse to get those little sparkling white teeth of every child brushed. :)
Get a Zip-loc baggie and snip the end off and insert a decorating tip in and push into the hole until it is snug. Be care if you squeeze too hard the frosting will come out around the tip. It worked fairly well for me and I normally just put icing in the bag and snip off the end depending on the amount of icing I need piped out. No fancy piping bags need apply.
Oh, yes we did. They were up there on the divine factor scale. I figured since we was going with the German chocolate type cake push pops per Kayleis request it would work. Her favorite part about this float was there was pieces of cookie left at the bottom of the glass when she got done.
Samoas Ice Cream Float:
Samoas Ice Cream
Coke
Pour your Coke in to the half point of the glass and top with a heaping tablespoon of Samoas ice cream and then top with Coke to get that float foam. So simple and quick.
She is a lover of doing "Deuces," complements of her daddy.
Oh, and I picked up a glittery Monster High skull sticker for $.99 for her cheek.
At our house we always do a favorite meal of the birthday person. Kaylei loves Tater Tot Casserole.
Tater Tot Casserole:
Chili- homemade and defrosted or you can make your own.
(canned chili mixed with hamburger meat and diced tomatoes works pretty well as a quick meat layer)
Heat your meat layer until nice and bubbly.....you want most of the liquid gone.
Top with tater tots and place in the oven until nice and brown.
Sprinkle your tots with cheese and turn your oven off. Place your casserole back in the oven to complete the melting process and pull out when you are ready to eat.
I hope you enjoyed this super lengthy "Birthday in a Box" post. Birthday in a Box has pretty much every theme you can think of to host an entire party. The shipping was really quick and came before the estimated date of arrival. The prices are affordable and the themes are in abundance. I can honestly say that it made this birthday party the easiest and non-stressful birthday EVER. If you want to check them out for you next party, I promise you will not regret it.
*"Birthday in a Box" sponsored this post.


