Printfriendly

Popular Posts

Showing posts with label Family Fun. Show all posts

Oh the Cows...and all of the Fabulous Billboards!


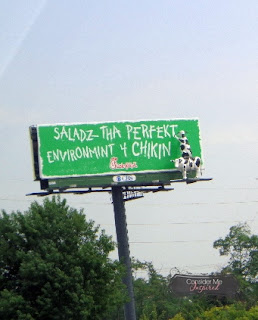
I have realized over the years that I am in love with Chick Fil A cow signs.  However, I only eat the grilled chicken sandwiches there and the waffle fries are pretty awesome.  How crazy is it for me to love the signs but not the food.  Lots of people find that they like something in particular and I just want the signs.  I am not interested in the nic knacks, calendars, cups or other collectibles.  I do not have one cow thing in my home, but over the last few years I have snapped a photo of every single cow sign I have passed.  If I missed the sign due to a truck obstructing my view or it was raining too hard, I would catch it on my next trip by.  You may see one here and there, but no city has as many cow signs as Atlanta, GA.  I am not talking about the regular flat billboards, but the ones with the cow statues.  They just brighten my day.  I hope they will make your Monday brighter.


You probably was not expecting that.  So far those are all of the cow billboards we have passed.  Mostly in Georgia and the others were in NC and MS.  These billboards and the giant peach water tower in Gaffeney, SC make traveling less painful. 


Monster High~ Birthday Party

Doesn't that sound so perfect?  A Birthday in a Box, is a great as it sounds.  Everything you need to decorate your birthday and it comes straight to your door step.  It takes the running around out of the equation and lets you focus on the more pressing matters.  I was kind of worried about it being too dark to celebrate a Summer birthday, but the bright pink, blue and purple really made it colorful.  I was so pleased with the outcome and my now 8 year old was in complete awe of the decorations.  She is stuck on Monster High and has been for around 2 years now.  Her favorite character is Draculaura{the pink one}, so she was so happy to get exactly what she wanted for her birthday.

This is everything that came in the package ready to decorate.

Kit Includes:
1 Monster High Centerpiece
1 Monster High Add An Age Banner
1 Monster High Swirl Cutouts
1 Monster High Confetti
10 Black Balloons
10 Hot Pink Balloons
1 Blue Curling Ribbon
http://onecreativeprocrastinatinggal.blogspot.com/

This is what I did with the items in the box:
  • I did have to separate the banner because it was so large and beautiful.  My doorway just called for it to be spaced together more. It worked perfectly and added to a perfect back drop.  The centerpiece for the banner comes fully customizable with each age with removable stickies.   {st, nd, rd, th included}
  • I took the balloons to Party City and had 12 of them blown for the price of $12.99 and had extras left over.  The balloons were tied off with the royal blue streamer.
  • The swirl streamer hung from the ceiling creating a lovely Monster High themed atmosphere.  They dangled at a nice length.
  • The cardboard hearts that came in the centerpiece package found themselves attached to the Happy Birthday Banner backdrop.  
  • The Monster High centerpiece was really lovely and served as a small cupcake stand.  I was surprised at how large it was.
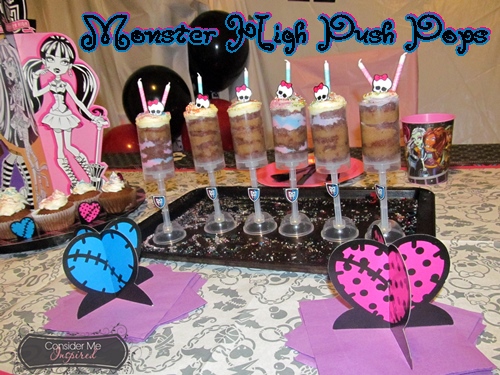
  • The confetti was used as the scatter for the push pops, as well as the pop toppers and the pop stands. I just used double sided tape to attach the Monster High icon to the front of the cake pop stand.  I positioned the little skull with a bow on the top of the frosting. 
http://onecreativeprocrastinatinggal.blogspot.com/

Things I had previously picked up:
  • Monster High table cloth for $2.75
  • Monster High themed tumbler $.87
  • Pink table cloth to wrap and tie to the birthday girl chair $1
  • White table cloth to use as photo back drop and to attach banner to $1
  • Devils food cake mix, pink/purple swirl frosting and coconut pecan frosting $8
  • Cake Push Pop stands was on sale for $4 normally $6- no piping bag or tip
  • Purple napkins, pink plates and black plastic ware $3
  • Pink and teal zebra designed candles $2


http://onecreativeprocrastinatinggal.blogspot.com/

 Cake Push Pops:
  • Bake your cupcakes according to the box and let cool completely.
  • Take 1 of your cake pop tubes and push through the center of the cupcake. 
  • Slice a few layers into your cupcake and place one at the bottom of the tube. 
  • Pipe your frosting in between each layer of cake.
  • Swirl your frosting at the top and let your child take over the sprinkles for the top.
  • Insert your Monster High confetti and your candles.  All done.
It was a little messy and calls for a larger amount of frosting than I anticipated.  Super sweet and enough to make any little girls day.  A great excuse to get those little sparkling white teeth of every child brushed. :)

http://onecreativeprocrastinatinggal.blogspot.com/

http://onecreativeprocrastinatinggal.blogspot.com/
Get a Zip-loc baggie and snip the end off and insert a decorating tip in and push into the hole until it is snug.  Be care if you squeeze too hard the frosting will come out around the tip.  It worked fairly well for me and I normally just put icing in the bag and snip off the end depending on the amount of icing I need piped out.  No fancy piping bags need apply.

http://onecreativeprocrastinatinggal.blogspot.com/

http://onecreativeprocrastinatinggal.blogspot.com/

Oh, yes we did.  They were up there on the divine factor scale.  I figured since we was going with the German chocolate type cake push pops per Kayleis request it would work.  Her favorite part about this float was there was pieces of cookie left at the bottom of the glass when she got done.  

Samoas Ice Cream Float:
Samoas Ice Cream
Coke

Pour your Coke in to the half point of the glass and top with a heaping tablespoon of Samoas ice cream and then top with Coke to get that float foam.  So simple and quick.

http://onecreativeprocrastinatinggal.blogspot.com/
She is a lover of doing "Deuces," complements of her daddy. 

http://onecreativeprocrastinatinggal.blogspot.com/
Oh, and I picked up a glittery Monster High skull sticker for $.99 for her cheek.

http://onecreativeprocrastinatinggal.blogspot.com/

At our house we always do a favorite meal of the birthday person.  Kaylei loves Tater Tot Casserole.  

Tater Tot Casserole:

Chili- homemade and defrosted or you can make your own.
(canned chili mixed with hamburger meat and diced tomatoes works pretty well as a quick meat layer)
Heat your meat layer until nice and bubbly.....you want most of the liquid gone.
Top with tater tots and place in the oven until nice and brown.
Sprinkle your tots with cheese and turn your oven off.  Place your casserole back in the oven to complete the melting process and pull out when you are ready to eat. 

I hope you enjoyed this super lengthy "Birthday in a Box" post.  Birthday in a Box has pretty much every theme you can think of to host an entire party.  The shipping was really quick and came before the estimated date of arrival.  The prices are affordable and the themes are in abundance.   I can honestly say that it made this birthday party the easiest and non-stressful birthday EVER.   If you want to check them out for you next party, I promise you will not regret it. 


*"Birthday in a Box" sponsored this post.


Fairy Party Shadow Wall

http://onecreativeprocrastinatinggal.blogspot.com/

How do you make the best party ever?   A shadow wall of course!  
http://onecreativeprocrastinatinggal.blogspot.com/

We set up this double purple plastic table clothes we got for a buck each with clear duct tape to attach them to the cement porch beams.  We had all of our spot lights set up in the back and was ready to start doing some shadow pictures.  For some reason every time it rains the winds blow super hard and it was fixing to rain.  The wind blows so hard it blows every thing off the porch and across the yard.  Really crazy!  Anyhoo, our wall was a quick backdrop for family photos and not as a shadow wall because the wind made its way with our decorations.  It was still pretty and I have wanted to try the cupcake flowers for a long time.

*You have to be super careful when popping the light through the cupcake liner because if it tears too much it will just keep falling off.  The ones that I accidentally ripped a bit much, I just attached a mini white cupcake liner in front of it to hold it.  It is really pretty and if you have the time and patience I would say try  this out.

The plan was to have all of our little fairy girls put their wings and tutus on and stand behind the wall and give a cool pose so we could have a few photos of fairy silhouettes of all the girls. :)  I just know it would have been so pretty.  I plan on attempting the shadow wall again in the future though.

http://onecreativeprocrastinatinggal.blogspot.com/

http://onecreativeprocrastinatinggal.blogspot.com/

  This was for a party for the girls and in their gift bags my mom got all the kids the blow up bam bam things.   Fun times.

http://onecreativeprocrastinatinggal.blogspot.com/

We are in the process of planning our next little get together.  My Kaylei-bug is turning 8 in just 3 days!

A Nerd and Twinkie Bicycle Cake

Yes, really a cake made from mostly chocolate stuffed Twinkies to look like a bicycle.  For our sons 4th birthday, he was obsessed with motorcycles and bicycles.  I looked all over the place for budget friendly motorcycle and bicycle cake stuff.  I searched all over the internet and looked through it seemed like 100's of pages with no such luck.  You just have to come through for you kids on their birthday.  I did what I do best, I turned to what I actually had in my kitchen and did my process of what might work.  This method may sound crazy, but 99% of my creations are a result of this madness. 

http://onecreativeprocrastinatinggal.blogspot.com/

So, how was it done?

The frame is made from cut in half Twinkies laid with the icing side down{yes, super messy}.
Wheels are made from vanilla cake with the multi-colored nerd candies as the confetti. 

The cupcakes- Nerd confetti cupcakes.
The "dirt" on the cupcakes is crushed up chocolate chip ring cookies. (you know the ones when you are a kid you put on your fingers as rings and eat them off) Well, that is what we did as kids and my kids love eating cookies off their fingers.  They giggle the whole time.

Spokes and handlebar- twizzlers and a cut in half peach ring gummy.
Seat- Chocolate Twinkie + 1/4 of a Twinkie drizzled in chocolate. 
I made chocolate frosting from scratch for this cake. (later post)
The red is from the spray red food coloring.

I was a little worried about the Nerd flavored cupcakes, but it was his favorite candy at the time and I figured why not.  They actually tasted really good and once baked, the candy melted into the batter.

We always share the sweetness with our neighbors!  I love having neighbors that don't mind me always bringing them food.  My son loved his cake and the design came together in the end and it resembled the brand new shiny red bike we got him for his bday.

Do you have fun with your kids birthdays?? Do you buy their cake, make it or have someone make it?


Teenage Mutant Ninja Turtle Snacks!

http://onecreativeprocrastinatinggal.blogspot.com/

Did you watch Teenage Mutant Ninja Turtles when you were a kid?  I did, it has been so long though I could only remember a few of the catch phrases.  The new TMNT does not use the "COWABUNGA" phrase, but that is a TMNT word to me.  I mixed the old with the new and we celebrated my son's 5th Birthday Teenage Mutant Ninja Turtle style.  

http://onecreativeprocrastinatinggal.blogspot.com/

How:
Mini brown cupcake wrappers- 1 TBL of Batter 
Confetti cake- prepare via box directions
Double cookies- one side is vanilla and other is chocolate
Saves $$

Pepperoni- Vanilla Cookies with chunks of red gummy for pepperoni.
Sewer Lid- Chocolate cookie with teal writing icing.
Extra Cheese- Vanilla cookie with other cookie extra frosting crumbled on top

Put pepperoni and extra cheese in oven under broiler to melt everything slightly- watch it closely.

I put the mini cupcake wrappers in a regular cupcake tin with 1 tbl of batter which makes it slightly non perfect cupcake shape...which I wanted.   Once cooled I squeezed a bit of cream cheese/butter cream blended frosting on the center of the cupcake and put the lids and pies on to complete!

Inspiration- Nice and simple....I wanted to incorporate the ninja turtle favorites in the cake.  I normally make the cakes so complicated each year and get stressed.  I had a little mouth to feed and he loves his cookies and cupcakes...so I decided to go with this theme.  He loved them.  I absolutely LOVE making themed desserts!

  
Creamy Garlic Laughing Cow- 3 wedges
Cream Cheese- 1 8oz pack

*Mix together the cream cheese and place in the freezer for few to firm up a bit.

2 cucumbers- Slice first and then peel with a peeler to get a whole strip. Gut the cucumbers center but leave a bit of a bottom.

Use a teaspoon to scoop up your cream cheese and press slightly into the cucumber.  Then flip it over so then it smooths over the surface of the cream cheese AND it is doesn't keep sticking to you.   Press you mini pepperonis on your turtle on a half shell.  


I wanted something that was veggie related so we did not have all junky snacks.  This is a  typical weave with the exception it is normally made out of bacon. Over and under....basic method.  It was super easy and I just lined the outside with the cucumbers...and the weave was a perfect set up for the snack card. 

Inspiration- I saw a appetizer of cream cheese and bacon stuffed cucumbers out there some where and really wanted to make them.  In my many marathons of TMNT with the kids I kept hearing "TURTLES ON THE HALF SHELL"....thus the turtles on a half shell was born.


1 Row of Butter Round Crackers
Shredded Colby Cheese- Grated
Shredded Cheddar- Grated
Mini Pepperoni

Place in the oven broiler for a few minutes.  Shut the oven but check super often.  I have charred way too many things with the broiler, way more than I would admit too.  To prevent ruined food, I will leave the oven closed for about 2 minutes and then I crack it so I can watch the food.  When I removed the crackers I took a spatula and ran it in between the crackers to make sure when the cheese firmed up a little more they could be picked up without pulling all the cheese off the others.   

Inspiration- When I was a teen, I would often get off the bus with my cousin and she would always make snacks for us.  One snack in particular was Ritz crackers with a regular sized pepperoni on each cracker and then topped with lots of shredded cheese; placed in the microwave for like 30 seconds or until melted.   


Box of $1 Gummi Lifesavers
Box of $1 Hot Tamales

Inspiration- I was searching bing images for turtle party snacks and ran across rice krispie sushi....rice krispy wrapped in fruit roll up and sliced.  It was super cute, but WAY to much work going on there.  Sorry, I was trying to be simple.  Anyhoo, I had a box of lifesavers in the snack drawer already and my son is in love with hot tamales.   I figured why not...it could resemble sushi!  I pushed the hot tamale through the middle and snipped the top off. 

He actually says "Hot Tamels" and can eat a whole box.  He fell in love with them last Summer when my mom gave them to him for the first time.   He hadn't eaten any in a while, so when he ate the first one....I happen to click the photo at the same time he was saying "Man!" "That was a hot tamel!"  He even had the woosh sound.....ROFL.


My awesome Rice Krispie Treat making husband made these.  They were super gooey and really yummy.  I have no luck with rice krispies, so he offered to make these.  
He says the secret is low and slow.....I trust him and he never disappoints. 

We picked up a Wilton Electric Melting Pot from Michaels.  Normally they are around 30 but I grabbed a 40% coupon and my hubby went and picked it up for 20.  I LOVE coupons for the craft store!  A.C. Moore always has great coupons...but they didn't have the Wilton pot I wanted.  

Anyway, he put them in the fridge for about an hour to firm up before dipping them.  We used cut in half wooden skewers for the dipping sticks.  Dip your turtle power balls and place on a sheet of parchment and place back in fridge to firm up. 

Inspiration- Gerry is in love with chocolate fountains so we wanted to give him something chocolate dipping related......plus I needed a snack to use with Turtle Power. 


Nose nuggets- Caramel Corn tossed in a few drops of food coloring.  Put them in a bag and drop in a few drops and swish them around and distribute as much as possible.  Add more of green food coloring drops if you would like more green!  

Inspiration- On one of the episodes of TMNT one of the turtles was talking about having nose nuggets. Yeah, pretty simple.


Vanilla Pudding- Prepared to pie filling instructions.
Chocolate Pudding- Chocolate pudding mixed with chocolate chip minis- prepared to pie filling instructions.

We used 2 packs of Sugar Free Fat Free pudding mix for each and placed in fridge until ready to assemble.
Gallon freezer bags or smaller if you like.  Vanilla pudding with 5 drops of food coloring and blended in bag.  Cut the tip off and pipe your pudding in your small mason jar.  Rotate your chocolate and green pudding and then place a chocolate cookie at the top to finish it up.


What you need:

2 packs of Sugar Free Fat Free Lime Jello- prepared to box instructions.

Berry Kool Aid prepared to box instructions.
1 pack of Hawaiian Punch pack--the individual ones for bottles of water.

Blend your jello(previously chilled and jelloized) with the drink mix well. I don't think jelloized is a word, but we will go with it.  Then, pour in your jars and the jello floats right to the top.

Inspiration- I ran across a website talking about all the vintage Ninja Turtle snacks throughout time and he had a recipe of jello and cornstarch to make it look like sludge.   I thought about this and seriously considered making some jello mixed with cornstarch, but then it just sounded too gross.  I wanted it to look gross not taste gross.  Great idea on the super ooze looks though.  I went ahead and tried to think of ooze factor and tasty factor.   I hope you love this ooze!   


Raphael and Leonardo are the turtles my son loves the best.   We found Double Sais like how Raphael uses at the $1 tree in a ninja pack.  Of course, he had to eat his pizza with his PIZZA FORKS! 


My hubby customized 2 swords into a double Katana back pack for Gerry so he could be like Leonardo.  Pretty neat and he loved it!  He is so grateful and happy to get whatever he gets and that brings a smile to our faces.  Now, that doesn't mean whatever it is will last, but that is a different story.

Thanks for sharing some of our special  moments with our birthday boy!   Stay tuned for a few of the TMNT decorations we went with.   We did not do a party party....normally it is just us and sometimes the little girl across the street comes down.  Birthdays are so special and I am so excited to celebrate them, but sad that my babies are getting bigger.  


Don't forget to scroll down and join the Like Me on Facebook blog hop below!


Make a Pancake Bar for Breakfast


Yes, indeed!  My husband wanted pancakes for breakfast and everyone always wants something different in theirs.  I came up with the perfect solution; a pancake bar!  I went searching around the kitchen and grabbed all of the ingredients I could think of to add to pancakes.  This was a huge hit at our house.  I was going to surprise them when I called them to come and put their ingredients in their pancakes, but my husband figured out something was up.  He says "Whatcha doin'?" The surprise was busted.  He was so happy he instantly came walking in the kitchen to let me know what he wanted in his pancakes.  The kids were so excited and all giggly because they got to have chocolate in their pancakes.   I wanted them to be a part of it, so I let them stand right on side of me(super supervised) and sprinkle what they wanted on their pancakes before I flipped them.  I know after this pancake bar we can never go back to regular pancakes at our house.   

So what did everyone choose?  (the kids are upside down so they could see everything)

Hubby's man cakes
Oreo and Granola
Oreo, Granola, Coconut, Marshmallows

Kaylei's baby cakes
Strawberry, Coconut, Chocolate Chips, Oreo
Oreo, Strawberry, Marshmallow- She made this one look like a smiley face with hair!
Strawberry, Oreo, Marshmallow, 1 blueberry

Little Gerry's baby cakes
Blueberry, Strawberry, Oreo, Chocolate Chips
Blueberry, Chocolate Chip and Marshmallow
Chocolate Chip, Marshmallow, Cookie, Blueberry

Momma cakes
Blueberry, Strawberry, Granola, a sprinkle of Chocolate Chips and Oreo with a pinch of coconut all mixed up together and then poured on the skillet.

How does your family like their pancakes?

Circus Monkey Fun Face Photo Board


This was a VERY large box.  It actually opened up it reached about 12 feet across and  was about 5'5" high.      Don't quote me on that exactly though, because it was over a year ago.  


I searched the internet and coloring books for a design that would fit the theme and I ran across this one. 

At the time my printer was out of ink, so I did the old fashioned light tracing.  I placed a piece of computer paper on the screen and traced as lightly as I possibly could.   That is why it is a bit messy.   However, it just goes to show you that you can have something cool and not have to spend a fortune or need special equipment to do it.

I am sure there are easier and more expensive options, but sometimes you just work with what you have.  In order to get the shape of a little hand, I traced my then 3 year old sons hands and they worked perfectly.  I did the eyeballing drawing per square in order for it to fit on the larger board.  


So that is the process of getting my forms set up for the board.  Lots of tracing, sizing, measuring and measuring and erasing again.  For decorating I used markers, glitter and felt. I added a bow and a hat to my little monkeys to make them even cuter with more of that jazz factor!  I hope you enjoyed this.   

Copyright © Consider Me Inspired | Custom Blog Design by Lilipop Designs