Printfriendly

Popular Posts

Showing posts with label Foodie. Show all posts

Hamburger Meat Tips and Tricks

Who loves cheeseburgers? Tacos? Spaghetti? Yes, we do too. I include hamburger meat in our weekly meals regularly. Not every meal, but some. I wanted to share with you a few things I have learned over my time cooking with hamburger meat. I go for 80/20 most of the time. We rarely buy 70/30~ too many fillers and grease for us. 

o If you add a bit of water to your hamburger meat, the fat will separate from the meat and when you scoop the meat up, the grease stays in the pan. You can also run your hamburger meat under hot water to remove the rest of the grease.

o Flatten and poke a small hole through the center of the burger to help keep the juices in when you are making a burger. It also insures that your burger is cooked in the center.

o If you flatten your meat in the baggie, it will defrost in a cinch when you are ready to prepare your meal. Oh, and it avoids the flip, scrape some cooked meat off and flip again while still being frozen in the middle. Not fun and such a time waster.
This is the answer.

o Prep your meat before you put it in the freezer. If you are wanting a portioned meal, flatten it and seal your ziploc; take a wooden spatula or plastic/meta to divide your meat into sections.

o You can skip your seasoning step on the meal of by seasoning beforehand and pop it in the freezer for whenever you are ready.

Cook your hamburger meat for the week and separate it into different baggies or containers. You can split the portion between the freezer  for later and the fridge for the ones you plan on making sooner. Then all you have to do is heat it up and you are good to go with putting your quick meal together.

Do you have any other tips for hamburger meat you have found to be helpful? 

Oatmeal pancake wrapped sausages with glazed Honeycrisp Apples


Breakfast time has so much potential. I like to change things up often and us try new things. The same meal plan often gets boring, so it is always nice for us to mix things up a bit. Today we tried a new recipe. You guessed it, oatmeal pancake wrapped sausages with glazed honeycrisp apples. I am big on using what I have and not making an extra trip to the store to get whatever it is I may need. So, for this recipe I did not have the breakfast style sausage links, but did have sausage on hand. It turned out nice and tasty. However, I think the breakfast type sausage would be easier to take a bite of. This is more of a fork and butter knife kind of breakfast.


Oatmeal pancakes:

1 cup flour
1/4 cup quick oats
2 tsp baking powder
sprinkle of salt
1 1/2 cup milk
2 tablespoons sugar
1 tablespoon oil 

Mix your flour, oats, powder and salt together. Add your milk, sugar and oil with a gentle stir until combined. A few lumps are alright. Spray your skillet with some cooking spray and use 1/6 cup scoops as your portion. Once it is nice and bubbly on top and cooked enough to flip, flip it over to brown the other side, then pull off the heat. 

Cook your sausages and set aside. Roll your sausages in your oatmeal pancakes and serve with your glazed apples. Yum!

Glazed Honeycrisp apples:

Core, peel and chop 2 Honeycrisp apples 
1/4 cup water
1/2 cup light brown sugar

Heat on stovetop at med-high heat until a thickened bubbly brown sauce forms. Serve on top or along side your oatmeal pancake wrapped sausages.

What did you have for breakfast? Have you tried anything new lately?


16 Nutritious Breakfast Options with Extras


Eating breakfast is so important, however if you are like most families, mornings may be quite hectic. Do you ever end up skipping breakfast because you are in a rush? It happens at least once a week here. Getting up at 6:00am for the day and our day typically starts at 7:30am. I make sure we get up earlier so we can have everything done to start the day right. You can always prepare your diced veggies at night time so your morning goes that much quicker. There is also great protein shake options for those of you that like that too. Stay tuned for a whole list of tasty smoothies and shakes in a future post. For now, we are just going to go over a bunch of nutritious meals that we have had on our meal plan before. What are some of you favorite meals for breakfast?

The portions for these meals looked a little like this:
  • 1/2 cup ww oats, splash milk, 1 packet sw n low, 1/2 cup blueberries, 2 sliced strawberries you can serve this with boiled eggs with 1 or none yolks and just the whites or you can even pan fry an 2 egg whites with 1 egg and so on. 
  • Omelet with 1/8 cup reduced fat cheese, and 3/4 cup O'Brien pot with 1 egg + 2 whites
  • 2 slices of Turkey bacon, 1 egg and 2 slices tomato in whole wheat wrap
  • Whole grain oatmeal served with 1/2 cup blueberries, 2 strawberries,  1 oz crushed almonds, splash of milk, 1 packet sw in low.
  • 1/2 cup oats with 1 oz. crushed almonds and splash of soy milk and a packet of  sw n low and 1/2 banana
  • 1 cup Fiber one cereal with 1% milk and 1/2 banana
  • 1/2 cup oats and 1/2 cup of berries with 1 egg 2 whites with a tbl of fresh salsa
  • 1 egg 2 whites, 1/4 cup reduced fat cheese, cup of spinach, green peppers for omelet over a wheat pita
  • 1 egg 3 white, gr peppers and spinach omelet with 1/4 cup cheese
  • 1 egg, 2 whites, 1/4 cup reduced cheddar, 1 cup fresh spinach in a wheat wrap
  • 1/2 cup of Cheerios with 2 diced strawberries
  • 3 turkey sausages, 1/2 cup of O'Brien potatoes and a tortilla
  • Ham egg whites shredded cheese and a mushroom scramble
  • Egg whites on a whole wheat bagel
  • English muffin with egg, turkey bacon and a slice of tomato 
As you can see I love some spinach..well lots of spinach, it really is my favorite thing to eat. It is so nutritious and besides it makes Popeye happy to see you eat your greens. It can get expensive with a wide range of ingredients, so we tend to stick to just a few key ingredients when doing the meal planning so we do not break the bank just on ingredients for different recipes. We did quite a few replacements and often times I was making breakfast for myself and my kids would eat something slightly altered from mine.  Those are just a handful of great options you can have for breakfast and surely start your day off right. 

Please enjoy a couple recipe cards from me to you! A print friendly button is at the end of the post or you can save the image in your digital recipe files and print it later. What are some of your favorite quick and nutritious recipes? 
What does your breakfasts normally look like? 


I am not sure on the calorie count, but I wouldn't imagine the calorie count is very high with all of the healthy options. 


Make S'mores in a Jar


I have already fallen into the Fall spirit. Fall is my favorite time of year. When it is cool and crisp out, the spices of the season are in the air and the beautiful Autumn colors are spread across all of the trees. No matter whether it is chilly out or hot out, s'mores are always a winner. Log snugglin' with s'mores is always a great way to share any moment. What about when it is raining outside? You can not very well go out and have a s'mores. One day when it was raining, probably the 3rd day in a row mind you, we wanted s'mores so badly and it was not happening. Or was it? Mason jars are always in my heart, oh and my kitchen. Mason jars are so versatile and they can be used over and over again....not to mention you can put them 'in' the oven. Welp, that is exactly what we did. 

*Place in oven just until nice and gooey at 350.

Every bite was so rich and decadent. We actually split ours due the sweetness of it all. Still very delicious and is chalked up on our favorite recipes list. How often do you get to enjoy s'mores?  

The directions are so simple....after your s'more cake cools, you can start putting your happiness in a jar. Follow the muffin directions and to get your graham cracker crumbles you smash up a pack or two of graham crackers and mix it with about a tablespoon of melted butter. Once, you mix the butter in you just work it into the crumbs until the consistency changes. You will know because it won't fall apart as easily. You will then press a thin layer{not too thin} into the bottom of the cupcake pan. Use the foil cupcake liners...it prevents any sticking and makes removal a cinch. 


Any questions? Are you not just wanting a s'mores now? 

Make a Cake in a Can

http://onecreativeprocrastinatinggal.blogspot.com/

Get your can....the only aluminum cans we have found this large are coffee tins.  Hopefully, you have one of these little babies laying around your house.
http://onecreativeprocrastinatinggal.blogspot.com/

Grease and flour your can just like a pan.  Make your cake per the package directions and pour it into the can.  This particular package was meant for 24 cupcakes, so it was rather small.  It was smaller smaller than your average cake by time it baked.  
http://onecreativeprocrastinatinggal.blogspot.com/

 It came out of the can super easy and it cooked nicely.  I think we will try a regular cake mix next time.  It was not as moist as we wanted it to be, but I think it was an error in the batter not the method.  It was a little dense, but still good.  That colored frosting comes made like that already and it even has cute little sprinkles. 
http://onecreativeprocrastinatinggal.blogspot.com/

This was the first of our can baking excursions and there will be more to follow.  With all things you do the first time there are a few little kinks that some time pop up.  We sliced it in half to make a layered cake.  This cake would make the perfect giant cupcake cake though. Just saying........

Sherbet Ice Cream Float Punch

http://onecreativeprocrastinatinggal.blogspot.com/

Do you have a favorite party punch recipe?  Well, this is one of ours and I am happy to share it with you today.  It is so easy and always a hit.  Not many kids will say no to soda and ice cream, especially when they are mixed together.  It is just like an ice cream float.  

Sherbet Ice Cream Float Punch:
* Quart of Orange, Yellow and Green Sherbet Ice Cream
* 2 Liter of Lemon-Lime Soda

Pour your chilled soda in a punch bowl and scoop your ice cream right on top and serve to your guest.

See, I told you it was nice and simple.  Have you ever tried this?  They sell each color separate or you can get it all mixed like this.  We poured some .79 Twist Up from the store in there and put a few scoops of Sherbet in and our birthday punch was ready.  Pretty short and sweet.  

Husband Freezer Meals


So what is in there??

Chicken, Black Bean and Green Chili Enchiladas
Chicken, Black Bean and Green Chili Mix for Burritoes

Homemade Chili for Hot Dogs
Meaty Chili (stay tuned)

Trio Meat Lasagna (Italian sausage, ground chicken and ground turkey blend)

Grilled Chicken Breasts

Chicken Teriyaki Meatloaf (add teriyaki glaze to the top instead of the usual sauce)
Sausage, Onion and Peppers

Shepherds Pie (just with hamburger meat instead of bbq pulled pork)
Chicken Salad-Sandwiches
Spaghetti Meat Sauce
Cupcake Pan Sausage Patties

Italian Sausage, Ground Turkey and Ground Chicken Patties


I made a small container of each enough for 2 meals at a minimum for him.  Why would you need meals for just your husband?  I couldn't leave and go to spend time in MS with my mom without preparing meals for him to have.  I felt better to know he had food if he wanted it and I wouldn't have to feel bad when he said "I miss your cooking!"  It took me a day and a half to make all of his food.  I made all of these recipes spicy or added cayenne or crushed red peppers, just how he likes it. The only things he would have to make is noodles or other things that are just better fresh.  I would say if you are going out of town or state and your hubby or significant other is staying home make the recipes to his liking.

Also, I stocked up a few more convenient items for him to have for breakfast, lunch and snacks.
*Granola bars, individual bags of chips, snack cakes, pop-tarts ...etc.
He is up at 3am for work, so easy breakfast!
 I normally make him a sausage and egg sandwich.


In the fridge I left him:
*Boiled eggs
*Potato salad
*Baked beans
*Individually wrapped chicken, black bean and green chili wraps.

Drink wise:
A pitcher of Kool-aid
A pitcher of Black and Pink Tea
A 1/2 gallon of cherry limeade drink in the freezer.

He was all set to not starve to death on nights he gets home late from work or live on fast food!  He wanted to make sure to tell me he didn't need me to do that because he can take care of himself, but oh well is what I said.  He is a really great cook, so when it runs out he can make his own and be fine.  It is just one of those things to be better prepared.

Chicken and Dumpling Pot Pie

http://onecreativeprocrastinatinggal.blogspot.com/

You can't get my soul foodie than this!   Chicken and Dumplings and a Pot Pie all mixed in one.

I made a chicken and dumpling meal maybe 2 nights before and for some reason I am always making too much food so then we have left overs.  Not a bad thing, but you don't want to eat the same food more than a day.   Then, I need to come up with something else to make with the leftovers. :)


Chicken and Dumplings
4 Chicken Breasts
Soup Pot
A few sliced celery stalk
Sauteed' onion
Brown Rice
Flour/Water/Garlic powder seasoned dumplings
Chicken Bouillon Cubes

Throw your chicken in a boiling pot of bouillon cubed up water until they are falling apart.  Take them out and let them cool slightly.  Enough to where you can touch them.  Cut your fat and other things off you don't want to eat.  I don't like the fatty part of it so I just cut it off.  Leave it on while you cook it for the extra juices.  Pour chicken water into a larger pot and add a few seasonings.  I normally just add a bit of garlic powder and Nature's Seasoning blend.  Drop in some baby carrots or other veggies. I let it cook for about 2 hours on medium.  

  I opened my steamed rice bag(while frozen still) and dropped it in the pot. Mix up your flour/water/seasoning together where it is a little thick but too thick.  You want it to be able to fall off your spoon easily.  Drop each tablespoon into the boiling surface and once it pops back up you are good to go.  You can drop several at the same time but just not too close to each other.  Once it pops up you can drop another closer by it and not have to worry about it sticking.   You may have your own version of dumplings, but this is just how I was taught to do it.  I have been meaning to try the rolled out flour into the paper thin strips as dumplings, but haven't got around to it.   I let it cook for about another hour and it was ready to eat.  You can refrigerate your Chicken and Dumplings until you are ready to make your pot pies.  

*The creamy color will come from some of the flour mingling with the chicken water. 

Chicken and Dumplings Pot Pie
2 Deep Dish Pie Crusts- Let them sit out until thawed.  

Heat up your leftovers and mix in corn, peas and green beans into your chicken and dumpling mix and pour into your pie crust pans.  Put on your top pie crust and pinch together.  Brush with milk, butter or water.  Bake in the oven for a while until nice an golden brown.  I baked it for about 35 minutes.  It didn't take that long to cook, because everything was already heated up.   

I really don't measure much, and I hardly every make the same exact thing the same way more than once.   It actually came out pretty good and who doesn't love a nice pot pie.  


Homemade Banana Ice Cream

Banana ice cream treat anyone?

Did you see my kids hands shoot up and wave around everywhere?  Probably not, but they did that. 
http://onecreativeprocrastinatinggal.blogspot.com/

 They seriously could care less that it was just frozen bananas they got for a treat.  I even managed to sneak some wheat germ in there.   They loved this alternative.

Banana Icecream:

Slice a few bananas and throw them in a freezer safe ziploc and leave it for about 20 minutes until frozen.  Take them out and let them thaw for a few minutes and blend slightly and VOILA you have healthy icecream. 

Frozen Yogurt Drops

http://onecreativeprocrastinatinggal.blogspot.com/
What you need:

Your favorite yogurt (Dannon Light Strawberry)
A baggie
Cookie or Jelly Roll Pan
Wax or Parchment Paper

Spoon or pour your yogurt into a baggie and place in the freezer for about 15 minutes so it will firm up a bit. Check it in about 10 depending on your freezer settings.  * Placing it in the freezer helps get a more uniformed yogurt dot.  Also, the yogurt will pretty much pour out the bag if you just try to do it straight out the fridge.

Pull your yogurt baggie out the freezer and snip the very corner off a side.  Not too big, because the yogurt will not come out neat.  Squeeze your dots onto your covered pan and once done you want to place the whole pan in the freezer...the longer they are in the longer they will stay frozen.  We only did about 1 hour and pulled them.  They start defrosting pretty fast.  Super cold yogurt...no complaints and it is a great healthy snack.  I hope you enjoy these if you get a chance to try them out.  A really simple and budget friendly way to beat the heat this Summer. 

How are you beating the heat?

Come join us with your Facebook, Twitter and Pinterest links on Like me on Facebook today.

Potato Log Soup


Holy moly!  We are fans of those yummy seasoned and deep fried potato logs! The little convenient store up the street has the beset potato logs.  I normally never eat at convenient stores, but I will make an exception for these.  I really wanted potato soup but I also really wanted some potato logs, so I mixed them together.  I have found over the years randomly mixing different things that sound like they go good together often turns out to be some of the best recipes.

Potato Log Soup

  • 4 Red Potatoes
  • 10 +2  Seasoned Potato Logs
  • Cream Cheese- 8 ounce pack
  • Sour Cream- few tablespoons
  • Butter- tablespoon
  • Garlic Powder- sprinkle
  • Onion Powder- sprinkle
  • 1 small onion- sliced and sauteed until golden brown
  • Crisped Bacon or cubed ham
  • Cheddar Cheese- small chunked
  • Parsley- Garnish

Cube and boil your red potatoes down until you can insert your fork in with ease.   Add your sprinkle of seasonings in...you won't need much because potato logs have so much flavor.  Add your cream cheese in so it can start to melt into your potatoes; add butter; add your meat; add your caramelized onions; crumble your 10 potato logs into your pot and let simmer for about 45 minutes.  Crumble a few pieces of cheese in the bottom of each bowl and ladle your soup in, add a dollop of sc on top and mix in.  Garnish your bowls with the 2 remaining crumbled logs, crumbled cheese and sprinkle your parsley to make it pretty!  There is nothing better to add to this dish except for a piece of FRESH french bread.  Mmmm....mmmm....mmmm!

*If you need a more creamy potato base you can add instant potato flakes.  I am normally not your cook all day kinda gal, so I cheat and after my potatoes are all tender...I add a bit of flakes to make my base. :)

Now, grab a beer and you are good to go.  My husband and the kids loved this potato soup and I was told all the other potato soups would have to be kicked to the curb.  It really doesn't matter what time of the year it is a good bowl of potato soup is always welcomed.

Overnight Southwestern Crockpot Breakfast

http://onecreativeprocrastinatinggal.blogspot.com/

Put some butter at the bottom to prevent the potatoes from getting hard
Shredded Red Potatoes- 4
Mushrooms, Red Peppers, Green Peppers, Onions-2 cups
Add Salt and Pepper if you like
Sausage- 4 links
Eggs- 12
Green Chilies- 1 4 oz. can
Cheese- 2 cups

Set on low for around 5 hours.  I know that is not overnight, but I guess my crockpot cooked faster.  You could try it on warm for a bit. Due to my husbands work schedule I am up at 3:15 and I wanted it to be done for him to be able to eat.   I just turned it off and at 6:30 it was still warm and ready for us to eat for breakfast.  You could always throw a spoon of salsa on it and call it done. :)  Easy enough, right! 

Make Your Own Hot Pockets

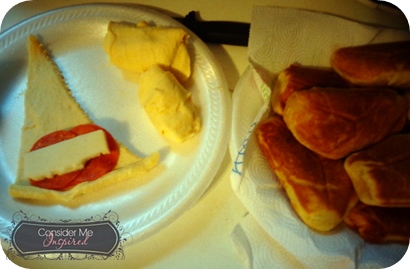
I tell you, these are much better than the pizza pockets in the store.  The store ones are practically dripping grease everywhere once they are done.  Little nasty grease pockets.  However, the ones I made at home are so easy.  So, here is what you need to make your own pepperoni and cheese pizza pockets.


2 cans of crescent rolls
1 package of pepperonis
Mozzarella Cheese sliced

Roll out your crescent roll and place 2 or 3 pepperonis on the bottom then the small slice of cheese and then place a few more pepperonis on top and roll up.  Do 4 at a time so you don't have 1 or 2 cooked more than the others.  That little sandwich things heats up pretty quick.  This one is old so it works better for stuff like this than say liquid type stuff.  The bottom wants to cook but the top is lighter, so I end up having to flip everything to try cook evenly.    My mom had one of these when I was little and she would make us eggs, grilled cheese sandwiches, muffins and everything else that would cook in it.  I love that I ran across one at a thrift store one day.  I really love it.   Do you have one of these?  I really don't know what it is called....Roundhouse is the brand. 


Chicken and Veggie Kabobs

http://onecreativeprocrastinatinggal.blogspot.com/

We love kabobs around our house.  It was raining out and I wanted some kabobs, so I pulled out the broiler pan and the skewers.   Grilling is our favorite way to have kabobs.

Chicken Breast seasoned with Dash Chicken Blend 
Sliced Red, Yellow and Green Peppers
Mushrooms
Onions

Cut your chicken and lightly pan fry both sides until golden brown.  
Put your sliced veggies on your skewers and place on your broiler pan rack.
Put water in the bottom of your pan and cover your skewers with foil and bake until the veggies are half cooked or all the way cooked if you like them like that.  The chicken was already pretty thin and was pan fried so it will be cooked all the way.   We had brown rice with our skewers.  YUM!

How do you like to make kabobs at your house?

15 Ingredient Trash Can Cookies

http://onecreativeprocrastinatinggal.blogspot.com/


What tha!  Yes, we made trash can cookies.  The kind you mix a bunch of stuff together in a bowl and call it a trash can cookie, because the ingredients differ so much.  My husband was bring some home for a while when he was still going on over night trips to Raleigh, but now he is doing Charlotte so he comes home every night; so no more trash can cookies for us.   I decided to make some...or at least try to. ; )

I ran across a book at Tuesday Morning on sale the other day and it was only $1.80, so being the bargain addict I am, I couldn't pass it up.  The book is called "Baking Kids Love" by Sur la Table.

The original recipe "Secret Ingredient Chocolate Chip Cookies."   You know me, of course I had to make some changes.  I figured since it had so many weird ingredients, I would add a few more because it couldn't hurt right. 

Trash Can Cookies

1 cup or 2 sticks of unsalted softened butter
4 Large eggs at room temp.
1 Tbl pure vanilla extract
1 cup corn or canola oil
4 cups All Purpose Flour
2 cups sugar
2 cups tightly packed brown sugar
2 1/4 cup old fashioned oats (not instant)
2 tsp salt
2 tsp baking soda
2 1/2 cups Kellogg's Corn Flakes (stick to this brand for the best result)
1 12 oz. bag of miniature semisweet chocolate chips

Extra Ingredients
1 cup Raisins
1/2 cup Crushed Almonds
1 cup Coconut Flakes


Mix your butter, eggs and vanilla extract together with a spoon.  Blend in the oil until well combined. 

Whisk dry ingredients together in a separate bowl and then add to the wet ingredients.  Stir well until it is all well blended.  You can even use your hands to really get it mixed in.  

Smash your corn flakes lightly in a bag. (Don't use the food processor because size will reduce too much)
Add your corn flakes and chocolate chips into the batter and mix well.  

You can use a small icecream scooper to get your cookies to size or you can just ball them up. Don't flatten them, just leave them in a ball.  I did the 4 finger pinch size for my first batch and it fit 12 cookies on a parchment covered jelly roll plan.  After the first test batch I did 1/2 of that portion to get smaller cookies.  Bake at 350 on the middle rack for about 9 minutes for larger cookies and 7 minutes for smaller cookies.  Not all ovens are created equal, so bake until lightly brown.   


This actually made A LOT of cookies.  I think I got around 6 dozen cookies.   I froze the remaining cookies after I baked 1 pan of large cookies and then 2 pans of small cookies.  
*Roll the rest of your cookies up and flash fresh for 2 hour on your parchment lined pans and then you can put them in airtight containers or ziploc baggies. 


Blueberry Sausage Muffins


My kids are always wanting those breakfast corndogs.  You know the ones, the blueberry pancake wrapped sausages on a stick.  They just cost so much and really does not sit well with me as a breakfast I want to give my kids to jump start their day.  I decided I was going to make an alternative to them.

http://onecreativeprocrastinatinggal.blogspot.com/

Really easy!

Martha White Muffin Mix- Make according to package
Original Johnsonville Breakfast Sausage- Cook, drain, refrigerate.

You can use any muffin or sausage you want, but those are just the ones that I used.   The pack of muffin mix gave me 6 muffin filled papers and 3 sausages cut in half was just enough.  Fill your muffin papers 1/2 full and insert your 1/2 sausage in the center.  A few of them did move a little, but for the most part they stayed in the middle.  

http://onecreativeprocrastinatinggal.blogspot.com/

Let them bake until nice and golden brown and serve with your kids favorites.  We just had some scrambled eggs.  The kids ate them up!  
http://onecreativeprocrastinatinggal.blogspot.com/


Crockpot Grilled BBQ Steak


What do you do with your left over steak?  Well, if you have any left that is.  These steaks were in the freezer and needed to be cooked.  Every once in a while a pack of meat gets lost in there and in order to save it from the trash we cook it up.  We happened to be grilling that weekend, so I pulled them out so we could grill them.  The next day I put them in crockpot and let the crockpot do all the work.  

 I put them in the pot when I went to bed on low and in the morning they were all done and ready to get shredded and sauced up just in time for my hubby to have some yummy bbq sandwiches for lunch.  

I toasted the buns a little in the toaster oven and Voila, this is what you get!  I wrapped them up and packed them in my husbands lunchbox for work.  He appreciated and loved them so much that is the first thing I heard from him when he got home that night. : )  Score...brownie points for this lady!

Chocolate Gravy and Biscuits

Apparently, it is a tradition in many southern homes to have chocolate gravy and biscuits for breakfast.  When you think of a nutritious breakfast to kick start your day...chocolate gravy and biscuits has probably never crossed your mind; probably for good reason.  However, that good reason is just a good reason and has nothing to do with enjoying some chocolate gravy and biscuits.  I know, I know....chocolate gravy just sounds really terrible.  Seriously it only tastes gross in your thoughts.....give it a go and I promise you will be sold and that gravy part goes right out the window.  I tried it and the the comparison of the gravy concept goes out the window.  It really is a sauce but someone along the lines decided to call it gravy, so we will stick with that.   Alright, let me tell you out this tasty little sauce.  I am from southern Mississippi and I can honestly tell you my momma nor my maw maw ever cooked biscuits with chocolate gravy.  We had flap jacks, homemade biscuits, homemade donuts and plenty of other things for breakfast though.  I figured I missed the boat on this one and I just couldn't not make this at least one time.  

Here is what you need:

1 cup of sugar
4 tablespoons of all purpose flour
dash of salt
2 tablespoons of cocoa powder
3 cups of whole milk or half and half  (I substituted 2 cups of 2% milk with 1 cup of heavy whipping cream)
1/2 stick of butter
1 teaspoon of pure vanilla extract


Put your sugar, AP flour, salt and cocoa powder in your saucepan and turn on medium heat.  Gradually add your milk and stir.  Once all of your dry and wet ingredients together...just stir every few minutes.  It actually took around 15 minutes to start to thicken. I thought that it was not going to thicken, but it eventually did and it turned out nice.  Pull your saucepan from the heat and mix in your butter and your vanilla.  Serve over some biscuits.  

Homemade biscuits are the best.  I would say if you are going to shoot for making some chocolate gravy, you mine as well go all the way and make your own biscuits from scratch too.  I had made my biscuits and forgot to pick up buttermilk so I just used regular milk.  No matter....I think I actually messed with the dough too much or either cut the biscuits too thin....because they literally was like a little flattened tea biscuit....they tasted good but could hardly be considered a biscuit.  I decided to make something else out of them because they did taste decent so I will be doing a post for them in the near future. 


Thank goodness I had the frozen....southern biscuits that taste just like if you bought them from a restaurant, Kfc or Bojangles.  I melted some butter on the top...split the biscuits open and poured on the chocolate gravy.

http://onecreativeprocrastinatinggal.blogspot.com/

http://onecreativeprocrastinatinggal.blogspot.com/


Now that it has cooled....I really think it could be eaten as pudding.  I will give it another day to sit and if that is the case oh my goodness that would be great to have accidentally figured out how to make pudding from scratch.  *It did thicken....I would say a little less vanilla a little more chocolate...;) It was super sweet and now I can say at least I made it once. 

So what are the odds of you fixing up some chocolate gravy and biscuit?  


Homemade Applesauce

In our home we tend to buy the conveniently packed foods and I am trying to get away from that.  I am making much more of an effort to actually try to prepare snacks and other things from scratch lately.   It tastes so much better, I know how it was made and what I am putting in my families body.  I can honestly say that it feels much better to make our own of what we can.  My very first attempt at trying to give my children a better snack option was to make homemade applesauce rather than picking up a container of already made applesauce in the store.  

Strawberry Stuffed Cupcakes


I originally made these for "Game Day" in support for the 49ers!  I never got around to posting it though.

Here is to the Black, Gold and Red!  

Copyright © Consider Me Inspired | Custom Blog Design by Lilipop Designs