Printfriendly

Popular Posts

Showing posts with label Thrifty. Show all posts

How We Save Money for Back to School

We are all on the hunt for outfits, shoes, school supplies and everything else that comes with going back to school. I very rarely purchase new clothes throughout the year for our kids. I find that they grow out of them too fast and ruin the best and most expensive ones first. I decided years ago that I would not do that anymore.One of our local children stores does a deal every so many months when they are changing out their inventory for the next season. They do a "Stuff a Bag" sale. You can stuff as many clothes you can in a regular grocery bag and you get it for $9 bucks. Yes, $9 bucks. When this situation presented itself to me, I was intrigued by the test of how much I could fit in one of those bag. I wanted to get as many clothes as I could without going past the one bag for 9 bucks. They had the bags hanging in the clearance section for easy access. Once you find your clothes, you remove the hangers and start your packing.

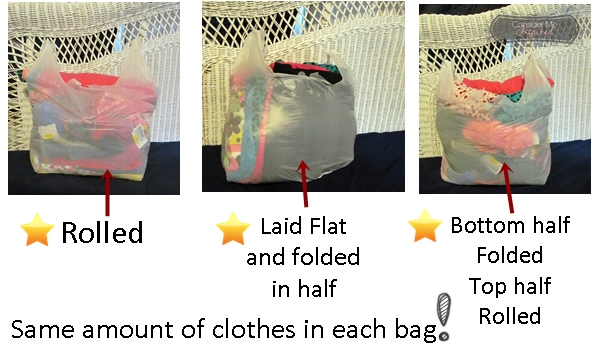
I tried 2 different ways to pack my bags and went with the laid flat and folded in half option. My husband packs his work truck so he is a pro at packing, so of course I wanted to see how I measured up to my husbands expert packing skills. I was pretty impressed with my outfit jackpot. Unfortunately, there was pretty much only girl stuff, no boy clothes. Luckily, my son has a nice stockpile of clothes and only needs a few things. I will go back to the same store and grab him a few more outfits. It is all lightly used, name brand clothes for a fraction of the original cost. I will take that any day. Anyhoo, let me show you all 3 packing processes and the result of the bag. I am all about trying different ways to do the same thing to get a different result...an even better one.


So, basically you get the same amount and they each had a bit more wiggle room. If they would have just been tossed in the bag, I would have NOT gotten this many clothes. I know it is crazy I got so excited, but hey when do you get almost 2 school weeks of clothes for that price. Practically a steal.


Okay, on to school supplies. No, we do not take part in the tax free days for school supplies as we do not have very many things to buy yet. I found that Wal-mart really let me down this year. The prices sucked to say the least. I needed non-pronged folders this year for my daughter and go figure an isle FULL of pronged folders. My options ended up being designed folders for .97 or a plain ones for $1.47, so we went with the designed ones. I wanted the sturdy little plastic non-pronged folders, but no such luck. I love the .50 crayons, .25 wooden rulers(craft wise) and $1 markers.  You can get a 12 pack of glue for only $3.44 at Hobby Lobby or each 4 oz. bottle of glue for .50 each at Wal-mart. I think they totally skipped out on the deals this year for back to school. I was not happy to see that the plain and designed 1 1/2" binders are almost $4 and $5. So, no happy school supply buying here. I spent more on school supplies than clothes. 

SHOES- I would be lying if I actually said our family does not have a ton of shoes. We all have multiple pairs, but the thing is with the kids is that they are very hard on their shoes.  My husband is very hard on his shoes as well and is always in need of a new pair. We buy so many shoes we get lots of rewards from Finish Line. We take advantage of the coupons($10 off purchase etc.) they send us through the mail, my husband gives the ones we do not use to his co-workers, which helps us as well. Finish Line continues to send more coupons and probably about every other month we get a $20 off coupon. So, we are all set with shoes and ready for school. I am pretty happy with having pretty much everything taken care of for both of my littles. Anyone can be a member and your points earn you the $20 cash card. 

Only 2 more weeks until school starts in this house. I think I may experience empty nest syndrome for a while. I am sure I will find something to do with myself. More on that later. 

What deals did you snag this year?

DIY Spooky Fun & Crafts for the Kids

Have you been searching for something fun, easy and budget friendly to do with the kiddos for Halloween? Have you scoured Pinterest and came out with having more ideas than plans? I love Pinterest for inspiration, but they do not always have what I am looking for which inspires me to create our own inspirational creations. My kids never get tired of playing games and having fun. Arts, crafts, games and other activities are at their peak at our home during the holidays. Hopefully, these fun crafts will give you something new to do. Feel free to pin to Pinterest and share with your friends. If you make some, by all means leave the link so I can check it out.  

This is a few things we have been up to lately: Polka Dot Bowling pins with a pumpkin as the bowling pin.

http://onecreativeprocrastinatinggal.blogspot.com/
Wash your empty soda bottles out and fill to a easily tipable level.
http://onecreativeprocrastinatinggal.blogspot.com/

There are so many creations you can come up with paper plates, styrofoam plates and even the recycled plates. Depending on what your crafting needs are...that is they kind of plate you want.  We wanted sturdy plates that would last, so for the activity plates below, we went with styrofoam.  

http://onecreativeprocrastinatinggal.blogspot.com/

Spooky Halloween streamer/hanging plates

Grab a empty toilet paper roll and some string.
 Cut 4 slits in each side.
Tie a knot on each end of the string and pull through the slits for legs.


Paper Towel tube cut in half.
 Paint your roll and the string black.
Let dry.
Cut a circle out of black construction paper.
Glue around the toilet paper ends and attach around the top.
Cut some eyes out or attach googly eyes.
I cut mine out of last years door cover.
Draw a little smile on and you can hang them from whatever you like.
Attach a string to the back end. You are all done!

Questions?


Make your own Halloween Tree Bags

Do you want to buy or create your own unique festive little creations? We love making our own decorations for Halloween. We made the cutest tree bags last year for Halloween instead of buying them from the store. I got the idea when looking through the Halloween stuff from the prior year and finding sheets of face stickers we got at a pumpkin patch. It seems like is is getting harder to find say the themed leaf bags and treat bags that are generic. We grabbed some inexpensive treat bags and our sheet of stickers and went to work crafting and creating.

http://onecreativeprocrastinatinggal.blogspot.com/

Grab you a pack of orange and black snack bags.
http://onecreativeprocrastinatinggal.blogspot.com/

Grab some string tie through the top, stuff in some newspaper and add pumpkin face stickers. 
 http://onecreativeprocrastinatinggal.blogspot.com/


DIY Tree Decorations
http://onecreativeprocrastinatinggal.blogspot.com/

My decorated Camillia Tree
http://onecreativeprocrastinatinggal.blogspot.com/

This is what they look like a year later- still going strong.
They just needed to be squished around a bit to make them roundish again.

Since we are talking about trees, I just have to share that my Camellia tree is blooming nicely. I love this tree and they are so beautiful. It has vibrant green leaves all year long and they bloom when Autumn comes and even stay for the snow.

1st flowers:


What kind of crafts are you making this year?


Repurposed Pumpkin Lantern Jars

Repurpose your glass jars into something to celebrate Halloween with. We wanted to have some cute little pumpkin lanterns, but I didn't really have the resources to create something extravagant. I love making something out of what I already have at home, so I went with something simple and cheap as possible. the kids decided what kind of faces they wanted on them and my daughter and I tried to draw some faces on them with a permanent marker and that was that. They could have came out better, but this way it was something we did together and loved in the end anyway.

http://onecreativeprocrastinatinggal.blogspot.com/

Materials: 
Orange tissue Paper
Orange Paint
Green Paint
Rubber Band
Battery Operated Tea Light
Marker or other face options
Optional: Candle Stick Holder and epoxy

http://onecreativeprocrastinatinggal.blogspot.com/

Throw in a battery operated tea light, and you're good to go.
http://onecreativeprocrastinatinggal.blogspot.com/

 If you want them to be candy jars, well just epoxy them to a $1 candle stick holder.http://onecreativeprocrastinatinggal.blogspot.com/

To finish up this repurposed creation, paint your jar orange and take the tissue paper and wrap around it and then secure with the rubber band at the top.  Cut off excess tissue on around lid area.  The paint is like glue and will make the tissue paper stick.  Let dry before you try to do a face. Put your battery tealight in and you have a lantern; glue a candlestick holder underneath and you have a candy jar. 

Have fun getting messy and being creative! 


Quick Kid Halloween Costume Ideas


Halloween is almost a week away, what am I going to do? Not everyone celebrates Halloween, but everyone should get to celebrate when they want to. Not everyone has an opportunity to go to the store and just buy whatever costume they want or have the money to make some extravagant DIY costume. I don't like spending all that money on costumes from the store, so I try my best each year to make them into something cool. I wanted to share with you a few options for Halloween that you already have at home or will cost little to nothing! We never got store bought Halloween costumes when I was younger. Luckily, I had a creative mom.

1.  Gypsy
 Long skirt, cloth tied around the side, 1 hoop earring on one side and a bunch of bangle bracelets.
2.  Hobo
Any clothes that you grab that are dark in color would work.  Get some black or brown make up and spread about on clothes and face.  You could take some kind of black tooth stuff and black a tooth or more out.  Ripped, holey, scuffed up or anything like that would work.
3. Baby
You can make a diaper out of a pillow case for a child. Pins and baby accessories can be found for a dollar if you don't have any on hand.  Binky, bib,  attach a bottle and grab a stuffed animal and go.
4. Pumpkin
Orange tights, orange shirt stuffed with pillows and cut out a design from felt or material and attach to the front of the shirt.  Green ribbon or headband that looks like the top of the pumpkin.
5. Zombie
Any clothes that are worn out, torn, dirty looking, splash some face blood and mess up your hair. If you good with makeup a little cheap make up kit or make up you already have would work if you know how to do that.
6. Flower
Grab a poster board and draw a flower design, then decorate it with some felt.  Wear all green or a long sleeved green top with brown bottoms for dirt.  Paint face to be yellow if you want.
7. Butterfly Or Fairy
Wear all of one color like black or whatever butterfly you want.  You can grab a pair of wings from the store or you can try your hand at making wings from stretching out a clothes hanger and pulling stocking over it.  You can then paint designs or throw some glitter on them for more effect.  Pipe cleaners and pom poms on a head band will make some antennas.
8. Witch- Regular or Sparkly
A cape can be made from material and ribbon.  Black tights and a little dress. You may have luck searching at the thrift store for old dresses or costumes.  You can get a hat for a dollar at the dollar tree.
9. Diva
Fake pearls, fake diamonds, big hat, scarf or boa, sparkly anything, bracelets, fake rings, makeup.
10. 50's Guy
white t-shirt with rolled up sleeves, blue jeans with cuffed up bottoms, slicked out hair, shiny shoes.
11. Ninja
Jump suit with a hoodie of the color ninja you want; black would probably work best.  Cut a strip of material and attach to hoodie for the covered mouth and nose area.  You can probably grab a sword or something from the dollar tree if you don't have one.  You could make nun chucks with tape and sticks.  Tape up the sticks and join together by folding the tape in half in the middle and then wrap tape to attach.
12. Banshee
White sheet with a head hole cut out, black wig or spray painted crazy hair. White and black face paint.
13. Super Hero
Piece of cloth or pillow case cut open long ways that is painted and a string to tie with. Cut out a shape of the letter of the name of your super hero and attach.  Grab a tshirt and some pants that are not jeans unless it goes with your super hero theme.
14. Mummy
Wrap yourself with a old sheet that has been cut, or grab some white streamer from the store and wrap yourself up.
15. Turtle
Green and black clothes, then stuff a pillow into a shirt for the turtle shell and make turtle shell designs on the back.
16. Puppy
White, Brown, or Black clothes. Paint Polka dots or patches all over or just over one eye.  Ears could be made by cutting out felt(.59 a square at walmart) and attaching with thread or glue to a head band or knitted hat.  Girls could wear all pink and be a girly dog with ribbons, a tutu or skirt, stockings...etc.
17. Kitty
Same as above but with kitty ears instead.
18. Angel
White clothes, sparkly dress, tights, anything for the outfit really as long as it is all white.  You can make a halo from crafting wire, pipe cleaner and a straw, or a clothes hanger. Twist and shape them how you want them and paint them if necessary.  Attach to a headband.  Wings can be purchased and spray painted white with hair glitter or you can shape some with crafting wire or clothes hangers, hot glue, stockings and string.
19. Dead Track Star
Jump suit all dirtied up, fake blood or graphic tattoos, headband, messy hair.
20. A Fish
A jumpsuit...sweat pants and a hooded shirt of the same color.  Just pick the color fish you want.  Paint face the same color and draw a few designs above the lip or maybe fake eyes on eyelids and your fish is complete. I like the little Lorax fish, so that is where the idea came from.
21.  Toy Box Monster
Hot glue a bunch of toys onto an outfit and that's that.  You could paint the face and make crazy hair for more of a monster look.
22. Vampire
Paint face white, have some blue/green eye shadow for around the eyes for a more dead look. Black, blood, fake teeth. Cape can be made of a painted, cut open pillow case and tied with string.  Clothes should be dark in color.
23. Sleep Over Victim
Wear some night clothes, put hair up with some pig tails, braids or pony tail, a robe, slippers or something along those lines.  You could pull stockings or socks over some tennis shoes or sandals. If you want to go with the sleep over attacked by a mad man or something then of course: messy hair, blood, messed up or dirty clothes.
24. Grandma
Night gown stuffed with pillows or stuffing, stockings or socks with one falling down, curlers all rolled up still, spray painted gray hair.  Pair of glasses around the neck on a glasses rope or chain if possible ($1 store).
25. Ghost
Sheet with holes cut out to see.
26. Bat
Black clothes for boys and girls could have a skirt and stockings.  Take some material that is cut in the shape of wings and attach to the sleeves and to the sides of the shirt for the flapping effect.
27. Singer
Clothes of your choice that are rocker worthy and grab a microphone from the store for a buck.  Glitter, grab some different color hair spray or just use hair spray to make big hair.
28. Frankenstein
Slacks, shirt, and get painted up green and black. They have cheap bolt tattoos you can pick up.
29. Bride of Frankenstein
Spray paint hair black with one strip of white and style up big.  Grab a long white dress and tie a rope around the waist.
  
Well, that is all that comes to mind right now.  Of course, these some of these require little to a bit more craftastic skills.  It also depends on your budget, what you already have at home or the thrift stores near by.  I hope this helped you out some if you are in need of an idea at the last minute. 
What kind of things have you been or your children in a pinch?


DIY Halloween Noodle Wreath

What do you do with all of the pool noodles that still seem to be getting in the way even though the warmer weather has gone? We decided to make a wreath with them. You can of course buy the green, itchy and way too messy floral foam for a buck at the Dollar Tree or maybe even the paper type wreath..but they are small. I wanted ours to be a certain size, so we customized our wreath for our door with a pool noodle. I mean why not. Think about it...you can poke stuff through foam and it stays and it is bendable enough to make a circle. Repurpose those old pool noodles, save a buck and use what you have.
http://onecreativeprocrastinatinggal.blogspot.com/
Spray paint your noodle.
http://onecreativeprocrastinatinggal.blogspot.com/

Wrap your noodle with wire ribbon- I picked up my black, sheer, glittered wire ribbon at the $1 tree.
It took 4 spools @ 9ft each ribbon to cover my noodle.
http://onecreativeprocrastinatinggal.blogspot.com/
If you stress your noodle a little it will get a cool sliced look to it like it was scratched by a monster.
Wrap a spool of sheer, spidered wire ribbon around your noodle.
It took 1 spool @ 9ft in length to wrap.
I picked up a bouquet of black roses with spiders in it and cut off the bottom and arranged it onto the wreath.  I tied a bow with black and orange ribbon then tied the center with a purple ribbon.

How neat of a idea this was!  This was a very inexpensive craft and served a great purpose. Getting the pool noodle up, saving money and getting a wreath out of the situation. I hope this craft inspired you to save a buck and choose to be thrifty. Have a great holiday season and happy crafting.


We made these too:


Copyright © Consider Me Inspired | Custom Blog Design by Lilipop Designs